> For the complete documentation index, see [llms.txt](https://help.blings.io/llms.txt). Markdown versions of documentation pages are available by appending `.md` to page URLs; this page is available as [Markdown](https://help.blings.io/apps/blings-studio/design-in-studio.md).
# Design in Studio
Use Design mode to select layers, edit visual properties, add layers, and adjust timing in Blings Studio
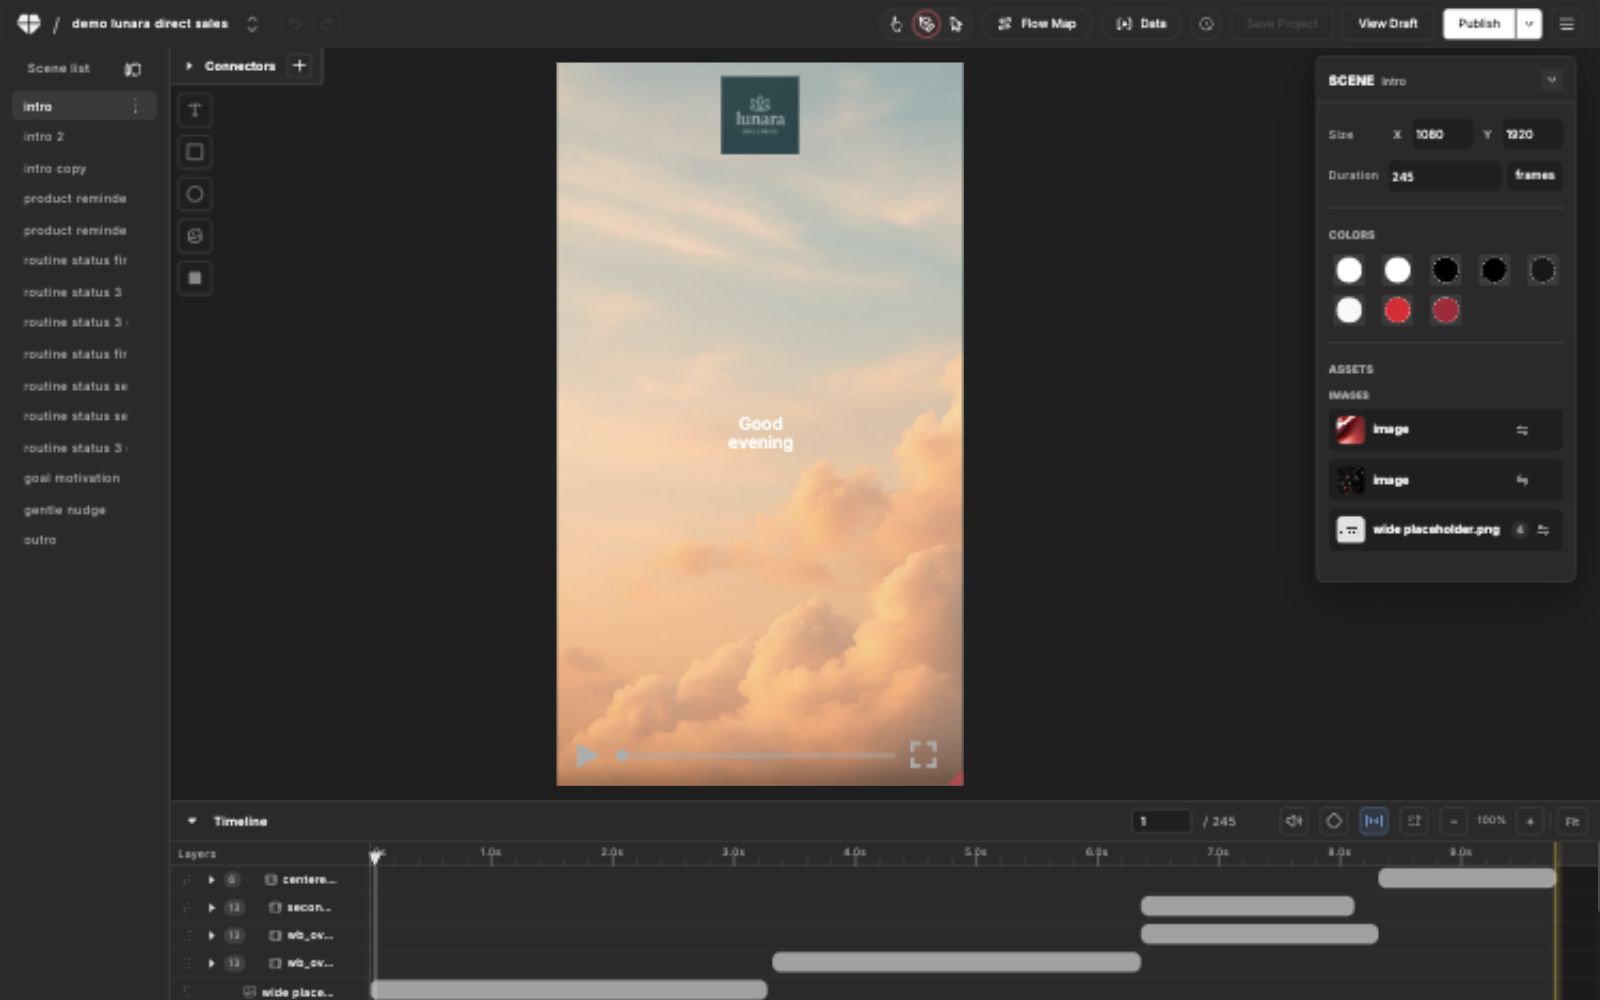
Design mode is where you change the visual build of a Studio scene. Use it to select layers on the canvas or timeline, edit scene and layer properties in the right panel, add new layers, arrange the layer stack, and adjust when layers appear.
{% hint style="info" %}
Design mode changes the draft Studio project. Use **Save Project** to store the change, then use **View Draft** when you need to review the saved draft player before publishing.
{% endhint %}
## Quick Start
Use this path when you only need to make a focused design change:
| Step | Action | Check before saving |
| ---- | ------------------------------------------------- | ------------------------------------------------------------------- |
| 1 | Select the scene from the scene list. | The canvas shows the scene you intend to edit. |
| 2 | Switch to **Design** mode in the project bar. | The add-layer toolbar, right panel, and timeline are visible. |
| 3 | Select the layer on the canvas or timeline. | The right panel shows layer properties instead of scene properties. |
| 4 | Update visual properties, layer order, or timing. | The playhead frame shows the expected result. |
| 5 | Select **Save Project**, then **View Draft**. | The saved draft player matches the Studio edit. |
## Before You Start
Use this page when a scene is already open in Studio and you need to change the design itself: layout, text, colors, assets, layer timing, layer order, or new visual elements.
You need:
* A project open in Studio.
* A scene selected from the scene list.
* **Design** selected in the mode switcher.
* Permission to save the project when the design update is complete.
Use **Connect** mode when you want to bind a layer to data, live controls, or interactions. Use **View** mode when you only want to inspect playback.
## Design Workspace
Design mode keeps the main design surfaces visible at the same time:
| Area | Use it for |
| ----------------- | --------------------------------------------------------------------------------------------- |
| Scene list | Choose the scene you are editing. |
| Canvas | Select visible layers, review placement, and use transform handles. |
| Add-layer toolbar | Add text, button, shape, image, video, audio, and background layers. |
| Right panel | Edit scene properties when nothing is selected, or layer properties when a layer is selected. |
| Timeline | Select layers, adjust timing, reorder layers, inspect keyframes, and trim scene duration. |
| Project bar | Undo, redo, save, open Flow Map, open Data, view draft, and publish. |
## Open Design Mode
{% stepper %}
{% step %}
### Select a Scene
Choose the scene from the left scene list. The canvas, right panel, and timeline update to that scene.
{% endstep %}
{% step %}
### Switch to Design
Use the mode switcher in the project bar and select **Design**. Studio shows the design canvas tools, add-layer toolbar, right-side properties, and timeline.
{% endstep %}
{% step %}
### Confirm the Current Selection
If no layer is selected, the right panel shows scene-level properties. Select a layer from the canvas or timeline when you want layer-level controls.
{% endstep %}
{% step %}
### Save the Draft
After editing, select **Save Project**. Use **View Draft** to review the saved draft player state.
{% endstep %}
{% endstepper %}
## Select Layers
Selecting a layer makes Studio focus the layer across the canvas, timeline, and right panel.
You can select layers in three common ways:
* Select a visible layer directly on the canvas.
* Select a layer row or timing bar in the timeline.
* Drag across layer rows in the timeline label area to select multiple layers.
Use **Shift**, **Command**, or **Control** while selecting to add to the current selection. A multi-layer selection is useful when you want to move timing together, duplicate a group of layers, delete several layers, or arrange multiple layers at once.
When you select a layer that is not visible at the current playhead frame, Studio can move the playhead to a frame where the layer is visible. This makes it easier to edit layers that start after the current frame.
To clear the layer selection, select an empty area of the canvas. The right panel returns to scene-level properties.
## Use the Right Panel
The right panel changes based on what is selected. Treat it as the main property inspector: when Studio can safely expose a visual property for the current selection, it appears here.
### Scene Properties
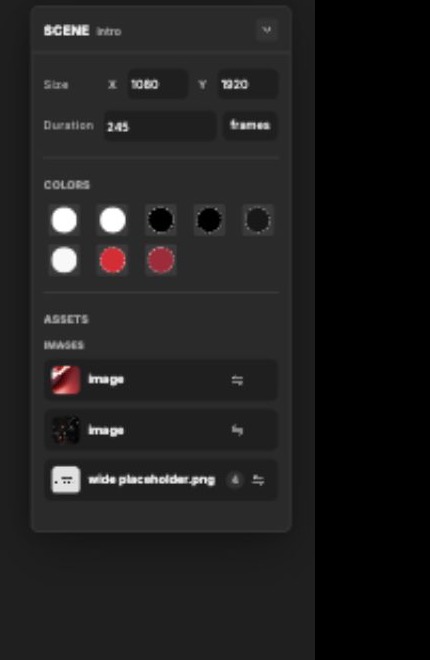
When no layer is selected, the panel is titled **Scene** and shows scene-level controls.
Use scene properties to edit:
* **Size**: scene width and height.
* **Duration**: scene duration in frames or seconds.
* **Colors**: scene-wide colors detected across the composition.
* **Assets**: image, video, and audio assets used by the scene.
Changing scene duration affects the work area and the timeline range. Recheck layer timing after changing duration, especially for layers near the end of the scene.
### Layer Properties
When one layer is selected, the right panel shows that layer name, layer type, duplicate and delete actions, and the editable visual sections for that layer.
Common layer property sections include:
| Section | Typical controls |
| ----------------- | ------------------------------------------------------------------------------------------------------- |
| Size and position | Align, position, scale, rotation, skew, and anchor point. |
| Text | Font, text color, size, content, line height, character spacing, outline, alignment, and text box size. |
| Shape or Path | Shape size, path, and round corners when supported. |
| Colors | Fill, fill opacity, outline color, outline width, and outline opacity. |
| Media | Replace image, video, or audio URLs, or upload a project asset. |
| Appearance | Opacity, visibility, blend mode, and blur. |
| Reveal path | Trim or offset a supported path reveal. |
Some controls are not available for every layer type. For example, a text layer exposes text controls, a shape layer exposes shape and color controls, and a media layer exposes media replacement controls.
If a property is animated or controlled by a connector, Studio shows that state in the property row. Edit the animation, freeze the animated value, or switch to Connect mode when the dynamic connection is the source of truth.
### Multiple Selected Layers
When multiple layers are selected, the panel title shows the number of selected layers. Use multi-selection for shared layer actions such as moving timing, duplicating, deleting, or arranging. Property editing depends on whether Studio can safely apply the selected property across the current selection.
## Add New Layers
In Design mode, the add-layer toolbar appears beside the canvas. Each button adds a new layer to the current scene and selects the new layer so you can edit it immediately.
| Layer type | What Studio adds |
| ---------- | ------------------------------------------------------------------------------------------------------------------------------- |
| Text | A centered text layer starting at the current playhead frame with a three-second default duration. |
| Button | A button precomp with a fill layer and text layer, starting at the current playhead frame with a three-second default duration. |
| Square | A centered square shape layer starting at the current playhead frame with a three-second default duration. |
| Circle | A centered circle shape layer starting at the current playhead frame with a three-second default duration. |
| Image | A centered image layer with a default image asset, starting at the current playhead frame with a three-second default duration. |
| Video | A full-scene video layer using a default video asset. |
| Audio | A full-scene audio layer for background sound. |
| Background | A full-scene solid background layer placed behind the visual stack. |
Video, audio, and background layers are created across the full scene by default.
After adding a layer:
1. Rename it from the timeline if the default name is too generic.
2. Set its position, scale, color, text, or media in the right panel.
3. Adjust its timing in the timeline.
4. Switch to Connect mode if the layer needs dynamic data or an interaction.
## Change Layer Timing
The timeline controls when each layer appears in the scene. Each row represents a layer. Each bar represents the time range where that layer is active.
Use this section for the common timing edits that come up while designing. For keyframes, easing, timeline filters, animation presets, and detailed timeline review, use the full Timeline page.
Use the timeline to:
* Drag a layer bar left or right to move the layer earlier or farther into the scene.
* Drag the left edge of a layer bar to change when the layer starts.
* Drag the right edge of a layer bar to change when the layer ends.
* Select multiple layers and move or trim them together.
* Drag the scene trim handle to adjust scene duration.
* Use **Fit** to fit the work area in view.
* Use the zoom controls to inspect frame-level timing.
The playhead shows the current frame. Clicking the ruler or dragging the playhead changes the current frame, which is useful before adding a new layer because several new layer types start at the current playhead position.
{% hint style="warning" %}
If a layer is connected to an interaction or dynamic behavior, changing timing can affect when the viewer can see or interact with it. Review the draft player after timing changes.
{% endhint %}
{% content-ref url="/pages/Dv1jr8KfYFf4bzRnq4OA" %}
[Timeline](/apps/blings-studio/design-in-studio/scenes-and-timeline.md)
{% endcontent-ref %}
## Arrange Layers
Layer order controls what appears in front of or behind other layers.
You can arrange layers in these ways:
* Drag the reorder handle in the timeline layer list.
* Drop a layer before or after another layer.
* Drop a layer inside a precomp when the target supports nested layers.
* Right-click a layer in Design mode and use **Bring to front**, **Bring forward**, **Send backward**, or **Send to back**.
Connected layer badges in the timeline show layers used by connectors. Select a badge to open the related connector when you need to understand why a layer is dynamic.
## Edit Layer Structure
Use layer structure actions when the composition needs a new layer stack, not just a property change.
| Action | Where to use it |
| --------- | ---------------------------------------------------------------------------------------------------------------------------------- |
| Duplicate | Use the right panel or Design mode context menu to copy selected layers inside the same scene. |
| Delete | Use the right panel, context menu, or Delete shortcut. Studio asks for confirmation when deletion affects connector-linked layers. |
| Copy | Use the Design mode context menu to copy selected layers. |
| Rename | Double-click a layer name in the timeline label list. |
| Reorder | Drag the timeline reorder handle or use the Arrange actions in the Design mode context menu. |
Duplicating a connected layer can preserve connector targets when Studio can map the copied layer safely. Check Connect mode after duplicating dynamic layers.
## Add Animation
Design mode includes animation actions from the timeline layer row and the Design mode context menu.
Use animation actions to add:
* Motion presets.
* Position, scale, rotation, and opacity animation.
* Layer style animation such as blur or color changes when supported.
* Character animation for text layers.
Use the keyframe toggle in the timeline header to show or hide keyframe rows. When keyframe rows are visible, you can inspect animated properties and adjust keyframe timing.
## Design Workflow
{% stepper %}
{% step %}
### Pick the Scene
Select the scene from the left scene list and confirm the canvas shows the correct state.
{% endstep %}
{% step %}
### Set the Scene Foundation
With no layer selected, set scene size, duration, colors, and shared media assets in the right panel.
{% endstep %}
{% step %}
### Select or Add Layers
Select an existing layer from the canvas or timeline, or add a new layer from the add-layer toolbar.
{% endstep %}
{% step %}
### Edit Visual Properties
Use the right panel to adjust position, scale, text, colors, media, opacity, visibility, and supported style controls.
{% endstep %}
{% step %}
### Set Timing and Order
Use the timeline to set when each layer appears and where it sits in the layer stack.
{% endstep %}
{% step %}
### Connect Dynamic Behavior
Switch to Connect mode when the layer needs personalized text, media, color, visibility, input, links, or branching behavior.
{% endstep %}
{% step %}
### Save and Review
Select **Save Project**, then use **View Draft** to confirm the scene behaves correctly before publishing.
{% endstep %}
{% endstepper %}
## Troubleshooting
| Issue | What to check |
| ----------------------------------------------------- | ---------------------------------------------------------------------------------------------------------------------------- |
| The right panel still shows **Scene** | No layer is selected. Select a layer on the canvas or in the timeline. |
| The panel says there are no editable layer properties | The selected layer type may not expose supported visual controls. Use the timeline, context menu, or Connect mode as needed. |
| A property is visible but cannot be edited | The property may be animated or controlled by a connector. Review the property row state, keyframes, or connector. |
| The layer is hard to find in the timeline | Use the layer selection on canvas, expand precomps, resize the label column, or disable timeline filters. |
| A timing bar is missing | Check whether **Clip to workarea** or **Show only animated layers** is active. |
| A newly added layer appears with default content | Replace default text, image, video, or audio in the right panel before saving. |
| A deleted or duplicated layer affects connectors | Review Connect mode and the connector list before publishing. |
## Related Pages
{% content-ref url="/pages/OP39eyA0PwJI89NZYL0x" %}
[Editor Workspace](/apps/blings-studio/editor-workspace.md)
{% endcontent-ref %}
{% content-ref url="/pages/Dv1jr8KfYFf4bzRnq4OA" %}
[Timeline](/apps/blings-studio/design-in-studio/scenes-and-timeline.md)
{% endcontent-ref %}
{% content-ref url="/pages/MfhlAKXUimxhaVZbrFBV" %}
[Connectors](/apps/blings-studio/connectors.md)
{% endcontent-ref %}
{% content-ref url="/pages/u16IuFWJ28ual5xEuspA" %}
[Draft Preview and Publishing](/apps/blings-studio/flow-preview-and-publishing.md)
{% endcontent-ref %}